I was asked at one of my recent sessions if I could write a ‘how to’ for the iPad carts that I collaborated on building for 10 classrooms in my current school. I am going to do that, but before I get to the ‘how,’ let me tell you the ‘why.’
When we were working toward going 1-1 with school-owned devices in our school, we realized that the process would be a drawn out one if we couldn’t cut some costs. Retail cases, high-priced charging stations, and expensive management options were not in the cards for us. So we opted to get creative. It took some research, some elbow grease and some innovation, but we were able to come up with some very effective solutions for outfitting our devices, allowing us to get more iPads into more student hands sooner. So, in the spirit of maximizing the little money we have in education fro these kinds of purchases, here is the process, and the pictures to help you build your own iPad mini cart!
*this cart MAY work for regular iPads as well depending how well you space the levels of the racks, but I have not tested it.
Our first goal was to find something to contain a class set of iPads. Prior to going 1-1 in classes, we had provided 5 iPads per classroom and were using a power bar in a drawer to secure them in each room. Clearly this was going to have to change when adding 20+ more devices. So we looked at what could store that many iPads in one place. One of my colleagues found a cart that fit the bill…from IKEA
The Raskog Cart was the right size to fit about 30 iPad Minis side by side on the three levels, and was available to us at only $60 per cart. We needed some other accessories, but it was a good start.

Raskog Kitchen Cart from IKEA ($60)
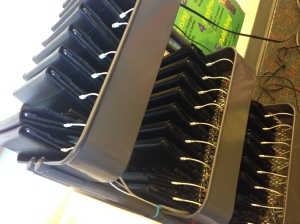
Next we needed some way to keep all the iPads in the proper location on the cart. Thanks again to IKEA we found some dish racks that suited our purpose. (BOHOLMEN $9) When our local IKEA ran out we sourced some others from Amazon ($10) as well. We needed three of these racks for each cart, one on each level.

Boholmen dish rack from IKEA ($9)

Bamboo Wood Plate Holder from Amazon.ca
Power management was a major concern with these carts. We wanted to ensure that they would not be drawing too much power, and that we were not ‘daisy chaining’ power bars (plugging one into another.) We had to find another way to power all these devices that would fit into fire code. So, after some research we found these nifty devices:

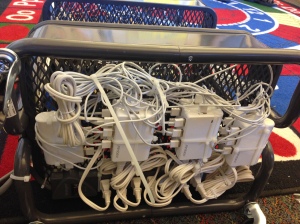
Each of these 4-port USB Charging Stations can charge 4 iPad Minis using one outlet plug. It took some research to find this particular charger because most USB hubs do not charge devices, even if they are powered. With these hubs, they are strictly meant for charging, not syncing, so they fit the bill for a classroom cart.
With no more than 28 students in each of our elementary classrooms, we could use a 7 port power bar ($20) and 7 USB hubs to power all of our iPads. If you needed more iPads on the cart, you could source larger power bars as well.
All that was left was to run wire and use an extraordinary amount of cable ties to keep it all in place.
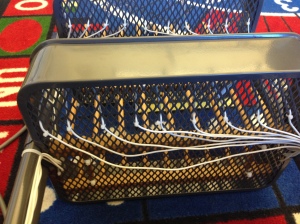
I started by securing the racks in place, and then laying an iPad in the first slot to measure how far out the charging cable needed to be, leaving a little play for students so they would not have to ‘pull’ the cord.

Find the right spot for the cables, and a convenient length for each, then cable tie them into place.
A view from the bottom, showing how each cable is tied to the mesh frame. I then cable tied all the cords to one side of the cart leading down. Note that the USB cables must be fed all the way from the bottom, unless you want them to have to travel down the outside of the cart to the Antec hubs.

Lead the cables to the side and secure them to the inside of the cart leading down, Your cords will be different lengths at the bottom, but that’s ok.
Once all your cables are leading through to the bottom, find the most convenient USB plug to put them in, wrap and tie down excess cord. Mine didn’t look pretty, but the key is that no cords will be hanging down and left to drag on the ground or get caught on anything. Don’t spare the cable ties, get EVERY cord.
This is what the final product looks like in my classroom.
It is compact, portable (the carts have wheels) and costs…$320 versus the thousands you could spend on a manufactured cart. As I said earlier it takes some work, but ultimately we had much more money to spend on devices for students by using some ingenuity. Another consideration we discussed was security, but our classroom doors remain locked in off times at our school, and during the summer months, these carts can easily be transferred to a secure location in the building. At this time we are comfortable with that, but I know this may not be the case for all schools. If security is a concern, you may wish to look at locking mesh bags as a security measure.
Let me know if you have questions, or found this useful. I receive questions about our project all the time, and I am happy to respond as I can.


Great job on the cart and on your writeup. You are amazing. 🙂 🙂
Ken.
“What lies behind us and what lies before us are tiny matters compared to what lies within us” Oliver Wendell Holmes Sent from my iPhone
>